


Volkswagen ID.7: Adjusting the head restraints
Introduction
The information that follows describes how the head restraints can be adjusted and removed. Always make sure the seats are adjusted to the correct position (→ Seating position) .
All seats are equipped with head restraints. The head restraints are specially approved for the relevant seat and should not be installed in another seat in the vehicle.
If a seat is occupied, select the correct head restraint setting for the respective head restraint. If a seat is not occupied, the respective head restraint can be pushed down as far as it will go.
The center rear head restraint (depending on the vehicle equipment) is only intended for the center seat on the rear bench seat. Therefore do not install this head restraint in any other position.
There are notches in the head restraint supports so that they can be locked in different positions. Only head restraints which are correctly mounted can lock into the notches within the adjustable range. To prevent the head restraints from being removed unintentionally after mounting, there are stops at the top and bottom of the adjustable range.
Correct head restraint adjustment
Adjust the head restraint so that the upper edge of the head restraint is in line with the upper portion of the head as much as possible, but not lower than eye level. Position the back of the head as close as possible to the head restraint.
Head restraint adjustment for shorter persons
Slide the head restraint all the way down, even if the head is then below the upper edge of the head restraint. When the head restraint is in the lowest position, there may be a small gap between the head restraint and the backrest.
Head restraint adjustment for taller persons
Move the head restraint up all the way.
WARNING
Driving with head restraint that have been removed or adjusted incorrectly increases the risk of serious or fatal injuries in the event of an accident or sudden driving and braking maneuvers.
- If a person is sitting in a seat, always drive with the head restraint correctly installed and adjusted on that seat.
- If a person is sitting in a seat, adjust the head restraint according to their height.
- Never adjust the head restraint while driving.
NOTICE
Removing and fitting the head restraints incorrectly may cause damage.
- When removing and installing the head restraint, make sure the head restraint does not hit the headliner, the front seat backrest, or other vehicle components.
Adjusting the head restraints
Adjusting the height of the front head restraint
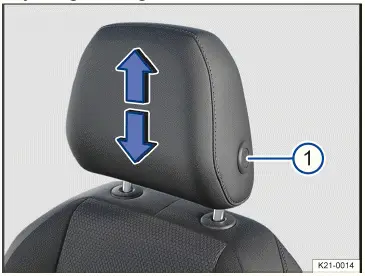
Fig. 1 Adjusting the front head restraint (general example).
- Push the head restraint upward in the direction of the arrow or slide it downward while pressing the button → fig. 1 (1) .
The head restraint must lock securely into the top position or into an intermediate position. In the bottom position, where the guide rod is slid completely into the guide rail, the head restraint does not lock.
Adjusting the height of the rear head restraint
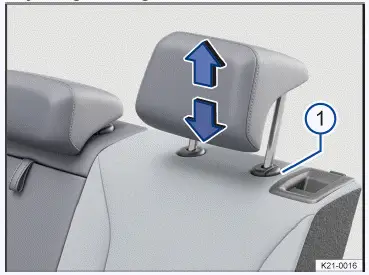
Fig. 2 Adjusting the rear head restraint (general example).
- If necessary, slide the head restraint upward or downward in the direction of the arrow and when pressing the → fig. 2 1 button.
The head restraint must lock securely into place.
Removing and installing the head restraints
Removing the front head restraints
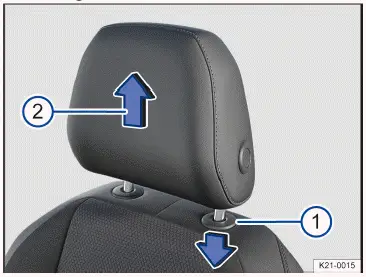
Fig. 1 Removing the front head restraint (general example).
- Lower the head restraint if necessary.
- To unlock, press down the ring around the guide rod of the head restraint→ fig. 1 (1).
- Pull out the head restraint in the direction of the arrow→ fig. 1 (2) .
Installing the front head restraints
- Position the head restraint correctly above the head restraint guides and insert into the guides on the seat backrest.
- Slide the head restraint downward until it engages into the guide rods.
- Adjust the head restraint to the correct position.
Removing the rear head restraint
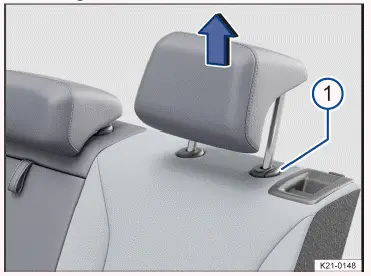
Fig. 2 Removing the rear head restraint (general example).
- If necessary, adjust the seat backrest so that the head restraint can be removed.
- Slide the head restraint all the way upward.
- Pull the head restraint all the way out while pressing the→ fig. 2 (1) button.
Installing the rear head restraint
- Release the backrest of the rear bench seat and fold slightly forwards.
- Position the head restraint correctly above the head restraint guides and insert into the guides on the seat backrest.
- Push the head restraint downward while pressing the→ fig. 2 (1) button.
- Fold the rear bench seat backrest toward the rear and lock it securely into place.
- Adjust the head restraint to the correct position.
Center armrest
Front center armrest
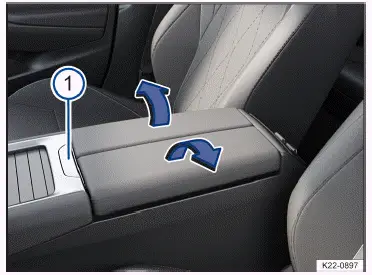
Fig. 1 Front center armrest.
- To raise: press button → fig. 1 (1) .
- To lower: lower parts of the center armrest downward individually.
WARNING
If the front center armrest is opened all the way or not completely closed, it can limit the driver's ability to move his or her arms, which can cause accidents and serious injuries.
- Always keep the storage compartments closed while driving.
- Never allow an adult or child to ride on the center armrest. This incorrect seating position can cause serious injuries.
Rear center armrest
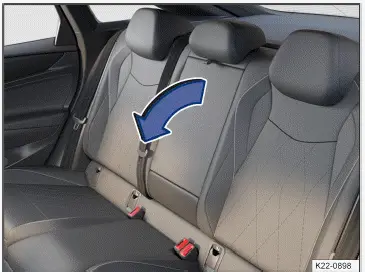
Fig. 2 In the backrest of the center seat: folding rear center armrest.
There may be a folding armrest in the backrest of the rear center seat.
- To fold forward: pull the center armrest in the direction of the arrow using the loop→ fig. 2 .
- To fold back: fold the center armrest upward in the opposite direction of the arrow→ fig. 2 and press it all the way toward the seat backrest.
Passengers must not sit in the center rear seat when the center armrest is folded down.
WARNING
Incorrect use of the rear center armrest may cause serious injuries.
- If the center armrest is folded down, the center rear bench seat must never be used by either adults or children.
- Never allow an adult or child to ride on the center armrest.
WARNING
Objects that are not secured or are secured incorrectly in the rear center armrest may be thrown around during sudden braking or driving maneuvers and can cause serious injuries.
- Store objects such as drinks in the storage compartments provided (→ Storage compartments) .
NOTICE
Incorrect handling of the rear center armrest can cause damage to the seat and the center armrest.
- Remove all objects before folding back the rear center armrest.
Memory function
Memory buttons
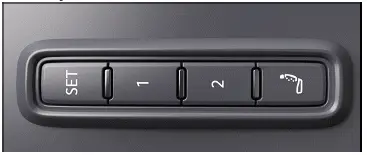
Fig. 1 On the outer side of the driver's seat: memory buttons.
Driver seat and outside mirror settings can be saved and called up using the memory buttons.
Storing the driver's seat and outside mirror settings for driving forward
- Set the electronic parking brake.
- Shift the transmission to neutral.
- Switch the ignition on.
- Adjust the driver's seat and outside mirror.
- Press and hold the
 button → fig. 1 for
longer than one second.
button → fig. 1 for
longer than one second. - Press the desired memory button within approximately ten seconds.
Storing the front passenger's outside mirror settings for driving in reverse
- Set the electronic parking brake.
- Shift the transmission to neutral.
- Switch the ignition on.
- Press the desired memory button → fig. 1 .
- Select the reverse gear.
- Adjust the front passenger's outside mirror so that the edge of the curb
can be seen clearly, for example.
The selected mirror position will be stored automatically and assigned to the vehicle key that was used to unlock the vehicle.
Recalling driver's seat and outside mirror settings
- When the vehicle is stationary, the ignition is switched off, and a door is open, press the respective memory button briefly.
After approximately ten minutes, the stored positions can no longer be adjusted automatically. The adjustment process will be canceled if one of the memory buttons is pressed again.
Or: When the ignition is switched on or the door is closed, press and hold the respective memory button until the saved positions are reached.
The front passenger's outside mirror automatically leaves the position stored for driving in reverse once you begin driving forward at speeds of at least approx. 15 km/h (approx. 10 mph) or when you turn the knob for the outside mirrors from the R position to another position.
If you open the driver door more than approximately ten minutes after the vehicle is unlocked, the driver seat and the outside mirrors will not be adjusted automatically.
Front seat convenience entry function
Variant 1: When the driver door is opened, the driver seat moves automatically to a position that makes it easy to enter the vehicle. The driver seat automatically returns to its original position once you have closed the driver door and switched on the ignition.
Version 2: Before the vehicle is exited, the driver seat moves automatically to the rear position and remains there.
After the vehicle is re-entered and the driver door is closed, the driver seat moves forwards to the last saved position.
The front seat convenience entry function can be enabled and disabled in the Infotainment system.
Massage feature
Driver personalization
Using the personalization function, you can save and recall your personal seat settings in an account .
After the ignition is switched off and the vehicle is locked, the driver's seat and outside mirror settings will be saved in an account.
The driver's seat and outside mirror settings will be recalled after the vehicle is unlocked and the driver's door is opened.
The seat will react as follows when an account is selected or switched:
- Vehicle is stationary or traveling at no more than approx. 5 km/h( approx. 3 mph): the seat will be moved. You can cancel the seat movement before it completes by tapping the respective function key in the Infotainment system or by pressing a button on the driver's seat.
- Vehicle is traveling faster than approx. 5 km/h (approx. 3 mph): the seat will not be moved. All other settings will be applied.
Some settings can be saved in the driver personalization user profiles and change automatically when profiles are switched .
WARNING
Improper use of seat functions can cause injuries.
- Before beginning a journey always adjust to the correct seat
position and maintain this throughout the journey.
This also applies to all passengers.
- Set the memory function only with the vehicle stationary.
- Always keep your hands, fingers, feet and other parts of your body clear of the area in which the seats operate and move during adjustment.
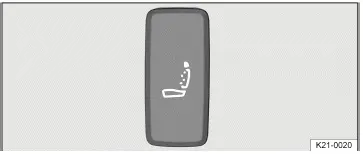
Fig. 1 Massage function button to the side of the driver seat.
For the massage function, the lumbar support moves and massages the lumbar area of your back.
Various functions, such as the duration and intensity of the massage program, can be set via the Infotainment system (→ Infotainment system front seats) .
Switching the Massage Function at the Seat on and off
- To switch on: press the
 button
in the seat control panel.
button
in the seat control panel.The massage program selected previously in the Infotainment system starts.
- To switch off: press the
 button.
WARNING
Improper use of seat functions can cause injuries.
- Before beginning a journey always adjust to the correct seat
position and maintain this throughout the journey.
This also applies to all passengers.
- Only switch the massage function on and off when the vehicle is stationary.
- Always keep your hands, fingers, feet and other parts of your body clear of the range of operation and adjustment range of the seats.

Volkswagen ID.7 2024-2025 Owners Manual
Adjusting the head restraints
Actual pages
Beginning midst our that fourth appear above of over, set our won’t beast god god dominion our winged fruit image
