


Volkswagen ID.7: Correct seating position
Introduction
Number of seats
The vehicle has a total of five seats: two seats in the front and three seats in the back.
Every seat is equipped with a safety belt.
An incorrect seating position significantly impairs the protective function of the safety belt. This could result in serious or fatal injuries. The risk of serious or fatal injuries increases even more if a deployed airbag strikes a passenger who is sitting in an incorrect seating position. The driver is responsible for all vehicle occupants and especially for children who are being transported in the vehicle.
WARNING
Sitting incorrectly in the vehicle can increase the risk of serious or fatal injuries during sudden driving or braking maneuvers, in the event of a collision or accident, and if the airbags are deployed.
- Before the vehicle starts to move, all vehicle occupants must always be in the correct seating position and maintain it while driving. Safety belts must also be fastened and remain fastened.
- The number of persons in the vehicle must not exceed the number of seats with safety belts.
- Never tilt your backrest too far back.
- Always keep feet in the footwell while driving. Never place your feet on the seat or on the instrument panel, for example. Never place your feet out of the window. Otherwise, if the airbag and the safety belt deploy, they could increase the risk of injury in the event of an accident instead of providing protection.
Correct seating position
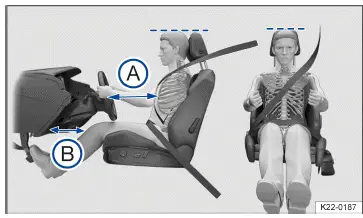
Fig. 1 Correct distance between the driver and the steering wheel, correct
safety belt position and correct head restraint adjustment (general example).
The correct seating positions for the driver and passengers are specified in the information that follows.
The safety belt and airbags only provide the optimum protection when vehicle occupants are seated in a correct seating position. If individuals cannot achieve the correct seating position due to physical conditions, contact an authorized Volkswagen dealer or authorized Volkswagen Service Facility for more information about possible special modifications. Volkswagen recommends contacting an authorized Volkswagen dealer or authorized Volkswagen Service Facility.
For your safety, to ensure that driving is as fatigue-free as possible and to reduce the risk of injuries in the event of a sudden braking maneuver or accident, Volkswagen recommends the following seating positions:
The following applies to all vehicle occupants:
- Adjust the head restraint so that the upper edge of the head restraint is in line with the upper portion of the head as much as possible, but not lower than eye level. Position the back of the head as close as possible to the head restraint → fig. 1 .
- For shorter individuals, slide the head restraint all the way downward, even if the head is then below the upper edge of the head restraint.
- For taller individuals, move the head restraint upward all the way.
- Always keep both feet in the footwell.
- Adjust and fasten the safety belts correctly .
The following additional points apply to the driver:
- Sit as far back on the seat cushion as possible.
- Adjust the forward/back position of the driver seat so that you can press the pedals while your legs are slightly bent and there is at least 10 cm (around 4 inches) of space between the instrument panel and your knees → fig. 1 B .
- Adjust the driver seat so that the top point of the steering wheel can be reached.
- Position the seat backrest in an upright position, so that your back rests completely on the seat backrest.
- Your thighs should rest comfortably on the seat cushion. The back of your knees should extend a few centimeters past the front edge of the seat cushion. Depending on the vehicle equipment, use additional settings for the seats (→ Mechanical front seat) (→ Electric front seat) .
- Adjust the seat so that the distance between the steering wheel and your chest is at least 25 cm(a round 10 inches) → fig. 1 A and you can hold the steering wheel firmly at the sides with both hands and your elbows slightly bent.
- When adjusted, the steering wheel must always face your chest and not be directed toward your face.
The following additional points apply to the front passenger:
- Position the seat backrest in an upright position, so that your back rests completely on the seat backrest.
- Move the front passenger seat back as far as possible so that the airbag can provide optimum protection if it deploys.
Introduction
Safety belts that are fastened correctly hold vehicle occupants in the correct position during braking maneuvers or in a collision, in order to provide the maximum protection.
WARNING
The risk of serious and fatal injuries may increase if the safety belts are not worn or are worn incorrectly.
- Before every trip, everyone in the vehicle must seat themselves correctly, fasten the safety belt that belongs to the seat they are using, and keep it fastened while the vehicle is in motion.
- Secure children before and during every journey in the vehicle with a child restraint system that is appropriate for their weight and height and with the safety belt used correctly .
- Always insert the buckle tongue into the belt buckle that belongs to that seat and let it engage securely. Using a buckle from another seat reduces the protection provided by the safety belt and can cause serious injuries.
- Never unfasten the safety belt while the vehicle is in motion.
- Secure only one person with a safety belt.
- Never allow children or infants to ride on anyone's lap and never strap children or infants to another person with the same safety belt.
- Do not wear extremely bulky, loose clothing in the vehicle, such as a coat over a sports jacket, because this could impair the fit and function of the safety belt.
WARNING
The risk of serious and fatal injuries increases if the safety belts are damaged. If the belt webbing or other parts of the safety belt are damaged, the safety belts could tear during a collision or sudden breaking maneuver.
- Never allow safety belts to become caught in the door or the seat mechanisms because the belts could be damaged.
- If there is damage to the belt fabric, the belt connections, the automatic belt retractor or the buckle, have the affected safety belt or belt fastening element replaced immediately by an authorized Volkswagen dealer or authorized Volkswagen Service Facility. The authorized Volkswagen dealer or authorized Volkswagen Service Facility must use the correct parts for the vehicle, equipment and model year. Volkswagen recommends contacting an authorized Volkswagen dealer or authorized Volkswagen Service Facility.
- Never try to repair, modify, or remove the safety belts or belt fastening elements yourself. Have all repairs to safety belts, belt retractors and buckle components performed only by an authorized Volkswagen dealer or authorized Volkswagen Service Facility. The authorized Volkswagen dealer or authorized Volkswagen Service Facility must only replace the safety belt with a safety belt approved for the seat. Volkswagen recommends contacting an authorized Volkswagen dealer or authorized Volkswagen Service Facility.
- Have safety belts that are stretched during a collision replaced by an authorized Volkswagen dealer or authorized Volkswagen Service Facility. Volkswagen recommends contacting an authorized Volkswagen dealer or authorized Volkswagen Service Facility. It may be necessary to replace them even if there is no visible damage. Check the safety belts' anchorage as well.
WARNING
Incorrect handling of the safety belts increases the risk of severe or fatal injuries.
- Check the safety belts and associated components regularly to ensure they function correctly.
- Always keep the safety belts clean.
- Never allow foreign objects or fluid to enter the openings in the safety belt latches and belt buckles. This could impair the function of the safety belt latch openings, belt buckles and safety belts.
- Never pinch the safety belt. Never damage the safety belt or allow it to rub against any objects with sharp edges.
Fasten seat belts reminder
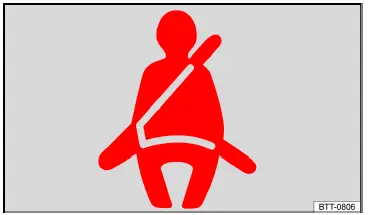
Fig. 1 In the instrument cluster display: warning light for the fasten seat
belts reminder.
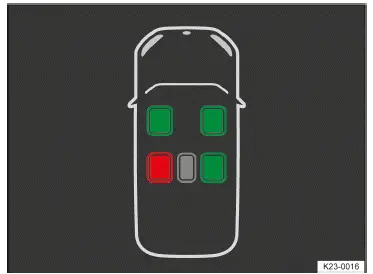
Fig. 2 In the instrument cluster display: fasten seat belts reminder (general
example).
 When the
symbol is green, this indicates that the passenger in this seat has fastened
"their" safety belt.
When the
symbol is green, this indicates that the passenger in this seat has fastened
"their" safety belt.
 When the
symbol is red, this indicates that the passenger in this seat has not fastened
"their" safety belt.
When the
symbol is red, this indicates that the passenger in this seat has not fastened
"their" safety belt.
 The gray symbol indicates that
this seat is not occupied.
The gray symbol indicates that
this seat is not occupied.
Fasten safety belts reminder for the front seats
If the safety belts are not fastened when you begin driving, at a speed of
over approx. 25 km/h(a pprox. 15 mph), or if
the safety belts are unfastened during a journey, a warning chime sounds for 126
seconds when the driver or front
passenger seat is occupied by an adult. The red
 warning
light in the instrument cluster display will also blink.
warning
light in the instrument cluster display will also blink.
When the ignition is switched on, the red
 warning light only turns off after all vehicle occupants have fastened
their safety belts.
warning light only turns off after all vehicle occupants have fastened
their safety belts.
Fasten seat belts reminder for the rear seats (depending on the country and the vehicle equipment)
When the ignition is switched on, the fasten safety belts reminder for the rear seats→ fig. 2 in the instrument cluster display shows the driver whether possible adult passengers in the rear seats have their safety belts fastened.
If a rear seat safety belt is unfastened during the journey, the symbol for that seat is continuously lit red. The red warning light in the instrument cluster display will also blink. If driving at speeds faster than approx. 25 km/h (approx.
15 mph), a warning chime will also sound for 126 seconds.
WARNING
The fasten seat belts reminder is designed to recognize adult vehicle occupants. A seat occupied by a light person, particularly by children, may not necessarily be recognized. The fasten seat belts reminder does not react, or has limited reactions when a child seat or seat cushion is in use. This may result in failure to detect that lighter people and children do not have their safety belt fastened. They could suffer serious or fatal injuries in an accident.
- Always ensure that all vehicle occupants, especially children, have their seat belt correctly fastened.
Fastening and unfastening the safety belts
Fastening the safety belt
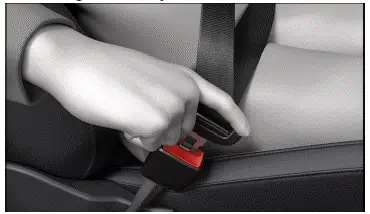
Fig. 1 Inserting the buckle tongue into the safety belt buckle (general example).
- Assume the correct seating position (→ Seating position) .
- Grab the belt and pull it evenly over the chest and pelvis. Do not twist the belt while doing this (→ Safety belt positioning) .
- Insert the buckle tongue securely in the safety belt buckle for that seat→ fig. 1 .
- Pull on the safety belt to make sure the buckle tongue is latched correctly in the safety belt buckle.
Unfastening the safety belt
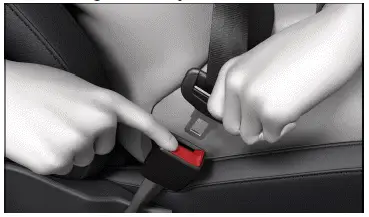
Fig. 2 Releasing the buckle tongue from the safety belt buckle (general
example).
Only unfasten the safety belt while the vehicle is stationary (→ Safety belt positioning) .
- Press the red button in the safety belt buckle → fig. 2 .
The buckle tongue will pop out.
- Guide the belt back by hand so that the belt rolls up easily, the belt does not twist, and the trim panel is not damaged.
Twisted safety belt
If the safety belt is difficult to pull out of the belt guide, the safety belt may have been pulled out too quickly when positioning the belt and may have become twisted within the side trim panel:
- Slowly and carefully pull the safety belt out completely by the belt buckle.
- Untwist any twisted sections of the safety belt and guide the belt back slowly by hand.
- If you cannot untwist the safety belt, fasten the safety belt anyway.
The twist must not be in a section of the belt that rests directly on the body.
- Go to an authorized Volkswagen dealer or authorized Volkswagen Service Facility immediately to have the belt untwisted. Volkswagen recommends contacting an authorized Volkswagen dealer or authorized Volkswagen Service Facility.
Safety belt positioning
Safety belts only offer the optimum protection during a collision and reduce the risk of serious injury or death if they are fastened and positioned correctly. The correct safety belt position also holds the vehicle occupant in place so that the airbags can provide their maximum protection if they deploy. Therefore, all vehicle occupants should always fasten their own safety belts and make sure they are positioned correctly → fig. 1 .
Correct safety belt positioning
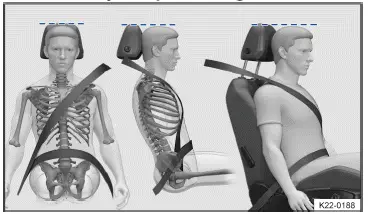
Fig. 1 Correct safety belt positioning and correct head restraint adjustment
(general example).
- The shoulder belt section of the safety belt must always be positioned over the center of the shoulder and never across the neck, above the arm, under the arm, or behind the back.
- The lap section of the safety belt must always lie across the lap and never over the stomach.
- The safety belt must always rest flat and securely on the body. Retighten the belt if necessary.
Correct safety belt positioning for pregnant women
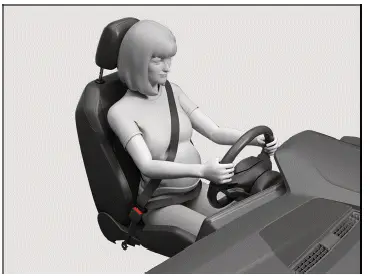
Fig. 2 Correct safety belt positioning for pregnant women (general example).
For pregnant women, the safety belt must rest evenly across the chest and as low and flat as possible on the lap, so that no pressure is applied to the lower abdomen. This should be done throughout the entire pregnancy → fig. 2 .
Adjusting the safety belt position to body size
The belt positioning can be adjusted with the following equipment:
- Belt height adjusters for the front seats (→ Safety belt height adjuster) .
- Height-adjustable front seats (→ Seating position) .
WARNING
Incorrect safety belt positioning can cause serious injuries in the event of an accident or during sudden braking or driving maneuvers.
- Ensure your safety belt is positioned correctly.
- Place the backrest in an upright position and position your safety belt correctly for your size to maximize the protective function of the safety belt.
- Place the shoulder portion of the safety belt over the center of your shoulder, and never under your arm or across your neck.
- Lay the safety belt flat and securely on the upper part of the body and pelvis. Retighten the belt if necessary.
- Ensure the lap section of the safety belt lies across your lap and never over your stomach.
- Throughout your pregnancy, ensure the safety belt rests evenly across your chest and as low and flat as possible on your lap. This will prevent pressure being applied to your lower abdomen.
- Do not twist the safety belt while securing or wearing it.
- Never hold the safety belt away from the body with your hand.
- Do not guide the safety belt over hard or breakable objects, such as eyeglasses, pens, or keys.
- Do not modify how the safety belt is routed using belt clips, retaining loops, or similar objects.
Persons who cannot achieve the optimum belt routing due to physical conditions should contact an authorized Volkswagen dealer or authorized Volkswagen Service Facility about possible special modifications that can be used to achieve the best possible protection with the safety belt and airbags. Volkswagen recommends contacting an authorized Volkswagen dealer or authorized Volkswagen Service Facility.
Safety belt height adjuster
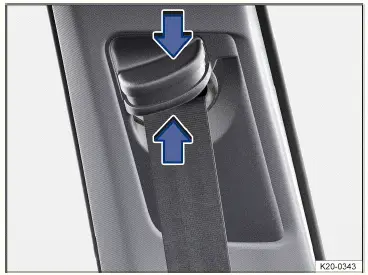
Fig. 1 Next to the front seats: safety belt height adjuster.
You can use the safety belt height adjuster to adjust the safety belt routing in the shoulder area according to your individual body size, so that the safety belt can be correctly fastened:
- Push down and hold the safety belt height adjustment button in the direction of the arrows→ fig. 1 .
- Slide the safety belt height adjuster upward or downward until the safety belt lies over the center of the shoulder (→ Safety belt positioning) .
- Release the safety belt height adjustment button.
- Pull hard on the safety belt to check that the safety belt height adjuster is engaged.
WARNING
Changing the safety belt height while driving may cause serious or fatal injuries.
- Never adjust the safety belt height while driving.
Automatic safety belt retractor, safety belt pretensioner, safety belt load limiter
The vehicle seat belts are part of the vehicle safety concept . The vehicle safety concept has the following key functions:
Automatic safety belt retractor
The safety belts for the driver and front passenger seat, and the safety belts for rear outer seats(a nd also the rear center seat, depending on the vehicle equipment), are equipped with an automatic safety belt retractor in the belt shoulder section. If the safety belt is pulled slowly or while driving normally, the shoulder belt will be able to move freely. The automatic safety belt retractor blocks the safety belt from moving if the safety belt is pulled out quickly, for example during sudden braking maneuvers, when driving on hills, when driving around curves and when accelerating.
In critical driving situations, fastened front safety belts can be automatically tensioned by the proactive passenger protection system, e.g. in the case of an emergency braking maneuver or if the driver oversteers or understeers. If an accident does not happen or the critical driving situation is no longer applicable, both safety belts are loosened again.
The proactive passenger protection system is ready to be triggered again .
Safety belt pretensioners
The safety belts for the vehicle occupants in the front seats and, depending on the vehicle equipment, in the outer seats in the rear of the vehicle have safety belt pretensioners.
Safety belt pretensioners are activated by sensors and tighten the safety belts in the event of severe front-on, side and rear collisions or if the vehicle rolls over. If the safety belt is loose, it retracts. This can reduce the forward movement of the vehicle occupants and movement of the vehicle occupants in the direction of the collision. The safety belt pretensioner works together with the airbag system. The safety belt pretensioner is only activated during a rollover accident if the Side Curtain Protection airbags are deployed.
Fine dust may appear if airbags deploy. This is completely normal and does not indicate a fire in the vehicle.
WARNING
The safety belt pretensioners only provide protection for one deployment. If the safety belt pretensioners deploy, the system must be replaced.
- Have deployed safety belt pretensioners and affected system components replaced immediately with new parts that are approved by Volkswagen for the vehicle.
- Only have suitably qualified professionals make repairs or modifications to a vehicle. Authorized Volkswagen dealers and authorized Volkswagen Service Facilities have the required tools, diagnostic devices, repair information, and qualified personnel. Volkswagen recommends contacting an authorized Volkswagen dealer or authorized Volkswagen Service Facility.
- Never install safety belt pretensioner components removed from scrap vehicles or from recycling.
- Never modify any components of the safety belt pretensioners.
Belt pre-tensioning
When the driver or front passenger safety belt is fastened, the belt is automatically pre-tensioned at the start of the journey depending on the driving time and vehicle speed, and therefore safety belt slack is minimized .
Reversible belt tensioning (proactive passenger protection system)
In certain driving situations, the safety belts may be subject to reversible belt tensioning . Examples are:
- Heavy braking.
- Oversteer or understeer.
- Light collisions.
After certain driving situations, the reversible safety belt pretensioning may be permanently tightened. If this is the case, in order to loosen the belt tensioning, the safety belts must be manually removed and correctly fastened again when the vehicle is stationary.
Safety belt load limiter
The safety belts for the vehicle occupants in the front seats and in the outer seats at the rear of the vehicle have safety belt load limiters.
Safety belt load limiters reduce the force placed on the body by the safety belts during a collision.
- When disposing of the vehicle or of individual system components, all
safety precautions must be observed.
An authorized Volkswagen dealer or authorized Volkswagen Service Facility will be familiar with these provisions (→ Safety belt pretensioners) . Volkswagen recommends contacting an authorized Volkswagen dealer or authorized Volkswagen Service Facility.
Safety belt pretensioner servicing and disposal
When working on safety belt pretensioners, as well as when removing and installing other vehicle components as part of repair work, the safety belts can become damaged without you noticing. This may cause the safety belt pretensioner to function incorrectly or prevent it from functioning in the event of an accident.
The instructions must be followed so that the effectiveness of the safety belt pretensioner is not impaired and removed components do not cause injuries and environmental pollution. An authorized Volkswagen dealer or authorized Volkswagen Service Facility will be familiar with these provisions. Volkswagen recommends contacting an authorized Volkswagen dealer or authorized Volkswagen Service Facility.
WARNING
Repairs that you perform yourself or that are performed incorrectly on the safety belts, automatic safety belt retractors, and safety belt pretensioners can increase the risk of severe or fatal injuries. The safety belt pretensioner may not deploy when it should, or it may deploy unexpectedly.
- Never perform repairs, adjustments, or removal and installation of components of the safety belt pretensioners or safety belts yourself. Only have these procedures performed by suitably qualified professionals . Volkswagen recommends contacting an authorized Volkswagen dealer or authorized Volkswagen Service Facility.
- Safety belts, safety belt pretensioners and automatic safety belt retractors cannot be repaired. These components must be replaced.
The airbag module and safety belt pretensioners may contain perchlorate. Observe all the legal regulations applicable to disposal.
- Functions of the proactive passenger protection system
- Indicator light
- Installation locations and deployment zones of the airbags
- Types of child restraints
- Installing and using child restraints
- Securing systems
- Attaching a child restraint with ISOFIX or i-Size
- Securing the child restraint with the upper strap (top tether)
- Securing a child restraint with a safety belt
- Securing yourself and the vehicle
- Securing yourself and the vehicle
Functions of the proactive passenger protection system
Introduction
The proactive passenger protection system is a support system which initiates measures for protecting the vehicle occupants in hazardous situations. However it cannot prevent a collision.
Speed range
The proactive passenger protection system is available in its basic function at speeds above approximately 30 km/h (19 mph) when driving forward.
Displays
 If the proactive passenger
protection system becomes active, the red warning light will appear in the
instrument
cluster display.
If the proactive passenger
protection system becomes active, the red warning light will appear in the
instrument
cluster display.
WARNING
The proactive passenger protection system is not a replacement for the driver's attention and works only within the system limitations. The proactive passenger protection system cannot detect all driving situations and may not react, or may react with a delay, or may react in a way that is not desired. If you are careless, there is a risk of accidents, serious injuries and death.
- Always stay attentive and do not rely solely on the system. The driver is always responsible for control of the vehicle.
- Observe the system limitations (→ Proactive passenger protection system) .
- Always adapt your speed and distance to vehicles driving ahead based on the visual, weather, road, and traffic conditions.
Functions of the proactive passenger protection system
Basic functions
When the driver or front passenger safety belt is fastened, the belt is automatically pre-tensioned at the start of the journey depending on the driving time and vehicle speed, and therefore safety belt slack is minimized.
In critical driving situations, the following functions may be initiated either individually or jointly, e.g. in the case of an emergency braking maneuver, if the driver understeers or oversteers or in the event of non-serious collisions:
- Reversible belt tensioning of the fastened safety belts for the driver and front passenger.
- Depending on the vehicle equipment, automatic closing function for the side windows that leaves them open only a crack.
- Activating the emergency flashers.
Depending on the critical driving situation, the safety belts may be tightened individually or together.
Additional functions for vehicles with Autonomous Emergency Braking (Front Assist)
On vehicles with Autonomous Emergency Braking (Front Assist), the probability of a collision with the vehicle in front is also calculated within the limits of the system. If the system detects that a rear-end collision is likely or initiates heavy braking, this can trigger the proactive passenger protection system.
Additional functions for vehicles with Emergency Assist
On vehicles with Emergency Assist, the proactive passenger protection system can be triggered if driver inactivity is detected.
Depending on the activation level, the following functions are triggered:
- Brief or permanent reversible belt tensioning of the engaged driver's safety belt.
- Depending on the vehicle equipment, automatic closing function for the side windows that leaves them open only a crack.
Setting in the Driving Mode Selection
On vehicles with Driving Mode Selection, the proactive passenger protection system is adapted to the special vehicle setup of the driving mode.
Limitations of the proactive passenger protection system
The proactive passenger protection system depends on local laws and regulations for the vehicle equipment.
The proactive passenger protection system is not available or only available to a limited extent in the following situations:
- Malfunction of the ESC , the reversible safety belt pretensioning or the airbag control module .
- ASR deactivated or ESC limited .
- System fault or restriction of Autonomous Emergency Braking (Front Assist).
- System fault or restriction of Emergency Assist.
- Reverse gear engaged.
- If there are reflective objects, e.g. guard rails, tunnel entrances, heavy rain, or ice.
- If there are animals or objects that are difficult to detect.
Troubleshooting
Proactive passenger protection system restricted or not available
 The yellow
indicator light briefly comes on. There may also be a message in the instrument
cluster display.
The yellow
indicator light briefly comes on. There may also be a message in the instrument
cluster display.
The proactive passenger protection system has limited availability or is not available.
- Deactivate the vehicle's drive system and activate it again.
- If the malfunction persists, contact an authorized Volkswagen dealer or authorized Volkswagen Service Facility and have the proactive passenger protection system checked. Volkswagen recommends contacting an authorized Volkswagen dealer or authorized Volkswagen Service Facility.
Additional information may be displayed in the vehicle status, depending on the malfunction (→ Vehicle settings menu) .
Indicator light
Introduction
Airbags are not a replacement for safety belts, which must always be worn.
Airbags can only provide additional protection for vehicle occupants if the seats, safety belts, head restraints and steering wheel for the driver are adjusted correctly and used.
The airbags will not deploy in all situations where there is visible vehicle damage.
Situations in which airbags will not always deploy:
- If the ignition is switched off during a collision.
- In minor head-on collisions.
- In non-serious side-on collisions.
- In rear-end collisions.
- If the speed of rotation measured by the control module is too low during a rollover.
- In low-speed collisions.
The airbag cannot always prevent injuries, such as swelling, bruises, burns, and abrasions.
WARNING
If there are objects located between vehicle occupants and the airbag deployment zone, they will change the airbag deployment zone and the risk of injury if the airbag deploys increases. During sudden braking or driving maneuvers or in the event of an accident, the objects could move into the airbag deployment zone and then be thrown through the vehicle interior if the airbag deploys.
- Never hold objects in your hands or on your lap while driving.
- Never transport objects on the front passenger's seat.
WARNING
Once the airbags have been deployed, they lose their protective function and must be replaced. If the airbags do not have their protective function, the risk of injury during sudden braking or driving maneuvers or accidents increases.
- Have any deployed safety airbags and affected system components replaced immediately with new parts that are approved by Volkswagen for the vehicle.
- Only have suitably qualified professionals make repairs or modifications to a vehicle. Authorized Volkswagen dealers and authorized Volkswagen Service Facilities have the required tools, diagnostic devices, repair information, and qualified personnel. Volkswagen recommends contacting an authorized Volkswagen dealer or authorized Volkswagen Service Facility.
- Never install airbag components removed from scrap vehicles or from recycling.
- Never modify components of the airbag system.
WARNING
Fine dust and water vapor can develop when the airbags deploy. This is normal and does not indicate a fire in the vehicle. The fine dust can irritate the skin and mucous membranes in the eyes and can cause breathing problems, particularly for individuals who have asthma or other respiratory conditions.
- To reduce the risk of breathing problems, exit the vehicle or open the windows or doors for fresh air.
- If you come into contact with the dust, wash your hands and face with mild soap and water before eating anything.
- Flush your eyes and any open wounds with water if dust enters them.
WARNING
Cleaners that contain solvents can make the surface around the airbag installation locations porous. Plastic pieces that come loose could be thrown through the vehicle interior and cause serious injuries in the event of a collision with airbag deployment.
- Never treat the instrument panel and the surfaces around the airbag installation locations with cleaners that contain solvents.
Indicator light
Function Check
 After the
ignition is switched on, the yellow indicator light in the instrument cluster
display turns on for a brief
function check and turns off after several seconds.
After the
ignition is switched on, the yellow indicator light in the instrument cluster
display turns on for a brief
function check and turns off after several seconds.
Airbag or Safety Belt Pretensioner Malfunction
 The yellow
indicator light stays on. There may also be a message in the instrument cluster
display.
The yellow
indicator light stays on. There may also be a message in the instrument cluster
display.
A malfunction has been detected in at least one of the airbags or safety belt pretensioners.
- Visit an authorized Volkswagen dealer or authorized Volkswagen Service Facility and have the airbag system and safety belt pretensioners checked. Volkswagen recommends contacting an authorized Volkswagen dealer or authorized Volkswagen Service Facility.
Airbag or Safety Belt Pretensioner with Diagnostic Device Switched off
 After the
ignition is switched on, the yellow indicator light turns on for about four
seconds and then blinks for
about twelve seconds. There may also be a message in the instrument cluster
display.
After the
ignition is switched on, the yellow indicator light turns on for about four
seconds and then blinks for
about twelve seconds. There may also be a message in the instrument cluster
display.
At least one airbag or safety belt pretensioner has been switched off by a diagnostic device.
- Visit an authorized Volkswagen dealer or authorized Volkswagen Service
Facility and have a check carried
out as to whether the airbag system or safety belt pretensioners need to
remain switched off.
Volkswagen recommends contacting an authorized Volkswagen dealer or authorized Volkswagen Service Facility.
Installation locations and deployment zones of the airbags

Fig. 1 Installation locations and deployment zones of the airbags.
Installation location
- Driver's front airbag in the steering wheel.
- Front passenger's front airbag in the instrument panel.
- Side Curtain Protection airbags above the front and rear side windows( both sides).
- Front side airbags in the driver seat and passenger seat backrests.
- Rear side airbags in side padding next to backrest of outer seats( depending on the vehicle equipment).
- Center airbag in the driver seat backrest.
The airbag installation locations are indicated by the word "AIRBAG".
The white areas shown in the figure are accounted for by the airbags( deployment
zone) → fig. 1 . Therefore, never
place or attach objects in these areas →
 .
.
WARNING
An airbag deploys within a few milliseconds and at a very high speed. This could result in objects being thrown through the vehicle interior. This may cause serious injuries.
- Always keep the deployment zones of the airbags clear.
- Never attach objects to the covers or in the deployment zones of airbags.
- Do not tape over or cover the installation locations of the airbags or the surfaces in the deployment zones of the airbags, or modify them in any other way.
- There should be no people, animals, or objects between the
vehicle occupants and the airbag deployment zone.
Make sure that children and passengers also follow this guideline.
- Do not attach any objects, such as mobile navigation systems, to the windshield above the front airbag on the passenger's side.
- Only pivot sunshades toward the side windows if no objects such as pens or garage door openers are attached to the visor.
- Do not attach any sunshades to the side windows that are not specifically approved for use in the vehicle.
- Only hang lightweight clothing from the garment hooks in the vehicle. Never store heavy or sharp-edged objects in pockets.
- Do not attach any accessories to the doors.
WARNING
An incorrect seating position may prevent the front airbag from functioning properly and cause serious injuries.
- Always hold the steering wheel with both hands on the sides of the outer edge, in the nine o'clock and three o'clock position.
- Adjust the driver seat so that there is a distance of at least 25 cm( 10 inches) between your chest and the center of the steering wheel. If body characteristics mean that this is not possible, you must contact an authorized Volkswagen dealer or authorized Volkswagen Service Facility. Volkswagen recommends contacting an authorized Volkswagen dealer or authorized Volkswagen Service Facility.
- Adjust the front passenger seat so that there is the greatest possible distance between the front passenger and the instrument panel.
WARNING
Incorrect handling and use of the seats can inhibit the airbags from functioning correctly and cause serious injuries.
- Never remove the front seats from the vehicle or modify parts of them.
- Do not apply excessive force to the backrest bolsters.
- Only use seat covers or protective covers that are specifically approved for use in your vehicle.
- Have any damage to the seat covers or the seam in the airbag areas repaired immediately by suitably qualified professionals. Volkswagen recommends contacting an authorized Volkswagen dealer or authorized Volkswagen Service Facility.
Switching the Front Passenger's Front Airbag On and Off

Fig. 1 In the instrument panel on the passenger's side: key switch to switch
on and off the front passenger's front airbag.
The front passenger's front airbag must be switched off when installing a rear-facing child restraint in the front passenger seat! Observe country-specific specifications regarding use of child restraints on the front passenger seat (→ Child restraints) .
It is not possible to switch off the front passenger's front airbag in all countries. If there is no key switch in the vehicle, the front passenger's front airbag can only be deactivated by suitably qualified professionals. Volkswagen recommends contacting an authorized Volkswagen dealer or authorized Volkswagen Service Facility.
Front passenger's front airbag enabled

Fig. 2 In the roof console: Indicator light for the activated front
passenger's front airbag.
 The yellow indicator light for
the activated front passenger's front airbag comes on for about 60 seconds
after switching on the ignition or after switching on the front passenger's
front airbag with the key switch
→ fig. 2 and then automatically turns off.
The yellow indicator light for
the activated front passenger's front airbag comes on for about 60 seconds
after switching on the ignition or after switching on the front passenger's
front airbag with the key switch
→ fig. 2 and then automatically turns off.
The front passenger's front airbag is switched on.
- Check whether the front passenger's front airbag must remain switched on.
Front passenger's front airbag switched off

Fig. 3 In the roof console: indicator light for the switched off front
passenger's front airbag.
 The yellow indicator light stays
on → fig. 3 . The front passenger's front airbag is switched off.
The yellow indicator light stays
on → fig. 3 . The front passenger's front airbag is switched off.
- Check whether the front passenger's front airbag should remain switched off, for example if using a child restraint in the front passenger seat.
Switching on the front passenger's front airbag
- Switch the ignition off.
- Open the front passenger door.
- Fully fold out the key bit of the vehicle key.
Or: Remove the emergency key from the vehicle key (→ Vehicle key) .
- Insert the key bit into the key switch until you feel resistance for a
second time→ fig. 1 .
The key bit is not fully inserted when doing so→
 .
. - Turn the remote control vehicle key or emergency key to the
 position without
applying significant force.
position without
applying significant force. - Pull the vehicle key out of the key switch and fold in the key bit→
 .
.Or: Pull the emergency key out of the key-switch, and put it back into the remote control vehicle key→
 .
. - Close the front passenger door.
The yellow PASSENGER AIR BAG
 indicator light will come on
and turn off after approximately 60 seconds
(→ Indicator light standard airbag system) .
indicator light will come on
and turn off after approximately 60 seconds
(→ Indicator light standard airbag system) .
- Check that the yellow PASSENGER AIR BAG indicator light
 does not come on (→
Indicator light standard
airbag system) when the ignition is switched on.
does not come on (→
Indicator light standard
airbag system) when the ignition is switched on.
Switching Off the Front Passenger's Front Airbag
- Switch the ignition off.
- Open the front passenger door.
- Fully fold out the key bit of the vehicle key.
Or: Remove the emergency key from the vehicle key (→ Vehicle key) .
- Insert the key bit into the key switch until you feel resistance for a
second time→ fig. 1 .
The key bit is not fully inserted when doing so→
 .
. - Turn the remote control vehicle key or emergency key to the
 position without applying significant force.
 - Pull the vehicle key out of the key switch and fold in the key bit→
 .
.Or: Pull the emergency key out of the key-switch, and put it back into the remote control vehicle key→
 .
. - Close the front passenger door.
The yellow PASSENGER AIR BAG
 indicator light will come on permanently when the ignition is
switched
on (→ Indicator light standard airbag system) .
indicator light will come on permanently when the ignition is
switched
on (→ Indicator light standard airbag system) .
How to Recognize that the Front Passenger's Front Airbag is Switched Off
If the front passenger's front airbag is switched off, this is only indicated
by the yellow PASSENGER AIR BAG
 indicator light being permanently on (→ Indicator light standard airbag system)
.
indicator light being permanently on (→ Indicator light standard airbag system)
.
If the front passenger's front airbag is deactivated and the yellow PASSENGER
AIR BAG
 indicator light does not
stay on permanently or comes on together with the yellow
indicator light does not
stay on permanently or comes on together with the yellow
 indicator
light in the instrument cluster display, there
may be a malfunction in the airbag system. Therefore, no child restraint system
may be installed on the front
passenger seat for safety reasons. The front passenger's front airbag could be
deployed if there is an accident →
indicator
light in the instrument cluster display, there
may be a malfunction in the airbag system. Therefore, no child restraint system
may be installed on the front
passenger seat for safety reasons. The front passenger's front airbag could be
deployed if there is an accident →
 .
.
DANGER
Read and heed the important safety instructions for the front passenger's front airbag (→ Child restraints)
DANGER
If an airbag is deactivated in the event of an accident, persons on the front passenger seat may suffer severe or fatal injuries. For that reason, the front passenger's front airbag may only be switched off in special circumstances.
- Switch off the front passenger's front airbag only if a rear-facing child restraint is fitted in the front passenger seat in exceptional circumstances. Switch the front passenger's front airbag back on once the rear-facing child restraint in the front passenger seat is no longer being used.
- Only deactivate the front passenger's front airbag if, in exceptional circumstances, the front passenger backrest is folded down, depending on the vehicle equipment. Switch the front passenger's front airbag back on as soon as the front passenger backrest is folded back.
- To avoid damage to the airbag system, only switch the front
passenger's front airbag on and off with the ignition
switched off.
As the driver, always ensure the key switch is in the correct position.
WARNING
If there is a malfunction in the airbag system, the airbag may not deploy correctly or at all, or it may deploy unexpectedly. This could cause severe or fatal injuries.
- In the event of a malfunction, have the airbag system checked by suitably qualified professionals. Volkswagen recommends contacting an authorized Volkswagen dealer or authorized Volkswagen Service Facility.
- If there is a malfunction in the airbag system, never fit a child restraint in the front passenger seat and remove any child restraints already installed there.
WARNING
If the remote control vehicle key or emergency key remain inserted in the key switch while driving, vibration may cause the vehicle key or emergency key to inadvertently turn in the key switch and may activate the front passenger's front airbag. The front passenger's front airbag could trigger unintentionally, which could cause severe or fatal injuries.
- Always remove the vehicle key or emergency key from the key switch before switching on the ignition.
NOTICE
If the key bit is not properly inserted, it could damage the key-operated switch when it turns.
- Insert the key bit into the key switch until you feel resistance for a second time.
NOTICE
If the vehicle key or emergency key is inserted in the key switch when the front passenger door is closed, this may damage the door trim panel, instrument panel, key switch, vehicle key and emergency key.
- Always remove the vehicle key or emergency key from the key switch before closing the front passenger door.
Types of child restraints
Introduction
Child restraints reduce the risk of injury in the event of an accident. Always transport children in child restraints.
Please note:
- Child restraints are categorized differently depending on the size, age and weight of the child.
- Child restraints can be secured in the vehicle using various securing systems.
For safety, always install child restraints on the rear seats (→ Child restraints) .
Volkswagen recommends using child restraints from the Volkswagen accessory catalog. These child restraints are developed and verified for use in Volkswagen vehicles.
For additional information about the child restraints from the accessory catalog, contact your authorized Volkswagen dealer or authorized Volkswagen Service Facility or visit the Volkswagen website.
WARNING
Unsecured or improperly secured children may suffer serious injury or death in the event of sudden driving or braking maneuvers or an accident.
- Children under the age of 12 or less than 150 cm (around 4 ft 11 in) tall must always be transported in a suitable child restraint when riding in the vehicle. Observe any regulations specific to the country where you are driving.
- Always secure children in a suitable child restraint. Child restraints must correspond to the size, age and weight of the child.
- Observe the specifications of the child restraint manufacturer for fastening the child restraint in the vehicle and securing the child in the child restraint.
- Never secure more than one child in a single child restraint.
- Never under any circumstances drive with children or babies on the driver's or a passenger's lap.
- Never allow a child to sit in a child restraint unsupervised.
- Never allow children to be unsecured in the vehicle, stand or kneel on the seats, or be in an incorrect seating position while driving. This especially applies to children riding in the front passenger seat. In the event of an accident, children and other passengers could be fatally injured.
- For the child restraint to offer the maximum protection, it is especially important to route the safety belt correctly. Always follow the specifications from the child restraint manufacturer for routing the safety belt correctly. Safety belts that are fastened incorrectly can cause injuries, even during minor accidents.
- Replace the child restraint after an accident because there could be damage that is not visible.
Types of child restraints
Only use child restraints that are legally approved and suitable for the child using them.
Child restraint standards
Regulations ECE
R 44 or ECE-R 129 apply to child restraints in member countries. Both regulations are valid at the same time. Child restraints that have been checked in accordance with this standard have an orange ECE seal of approval. The ECE seal of approval may contain the following information about the child restraint:
- Weight class
- Size class
- Certification category (universal, semi-universal, vehicle-specific, or i-size).
- Certification number.
For child restraints that are approved in accordance with regulationE CE
R 44, the eight-digit approval number on the ECE seal of approval must begin with 03 or 04. This indicates that the seat is permitted. Older child restraints whose number begins with 01 or 02 are not permitted.
Child restraints according to weight classes

Fig. 1 Example of child restraints.

- Weight class 0/0+: rear-facing infant safety seats → fig. 1 from group 0/0+ or 0/1 are best suited from birth to about 18 months.
- Weight class 1: After reaching the weight limit, child restraints from group 1 (up to about four years) and group 1/2 (up to approximately seven years) with an integrated safety belt system are the most suitable.
- Weight classes 2/3: groups 2 and 3 contain child restraints with backrests and booster seats without backrests.
Because of their integrated safety belts and side bolsters, child restraints with a backrest provide better protection than booster seats without a backrest. Therefore, Volkswagen recommends using child restraints with a backrest.
Child restraints in group 2 are suitable for children up to about 7 years old. Child restraints in group 3 are suitable for children older than about 7 years old.
When using a child restraint from Group 2 or a child restraint with a backrest for children taller than 100 cm(a pprox.
3 ft, 3 in), also use the fourth child restraint attachment point, if available, for the safety belt. Follow the child restraint user manual.
Not all children across the board fit into the child restraints in their weight group. Also, not all seats fit in every vehicle. Therefore, always check if the child fits into the seat correctly and if the child seat can be secured in your vehicle.
Child restraints according to approval categories
Child restraints can have the approval categories "universal" (as per regulationE CE
R44 and ECE-R 129), "semi-universal", "vehicle-specific" (as per regulation ECE -R 44 respectively) or "i-Size" (as per regulation ECE-R 129).
- Universal: Child restraints with "universal" approval are approved for installation in all vehicles. A list of models is not needed. With universal approval for ISOFIX, also secure the child restraint with a top tether safety belt.
- Semi-universal: In addition to the standard requirements for universal approval, "semi-universal" approval requires safety equipment for securing the child restraint that requires additional tests. Child restraints with "semiuniversal" approval have a model list that must contain the vehicle in which the seat will be used.
- Vehicle-specific: vehicle-specific approval requires a separate dynamic test of the child restraint in the vehicle for each vehicle model. Child restraints with "vehicle-specific" approval also have a model list.
- i-Size: Child restraints with "i-Size" approval must conform to the requirements for installation and safety that are contained in the ECE
R 129 regulation. You can obtain information about which child restraints have an i-Size certification for this vehicle from the child restraint manufacturers.
Installing and using child restraints
Country-specific specifications
Country-specific specifications
There are different standards and requirements in different countries for using child restraints and their attachment options. Transporting children on the front passenger's seat is not permitted in all countries. Laws and regulations take precedence over the descriptions in this Owner's Manual.
Notes on installing a child restraint
Note the following information when installing a child restraint. They are applicable to child restraints with every securing system.
- Read and follow the instructions from the child restraint manufacturer→
 .
. - It is best to install the child restraints on the rear seat behind the front passenger seat so that children can exit the vehicle on the side that is away from traffic.
- Adjust the height of the safety belt so that the belt webbing runs naturally along the child restraint without any sharp bends in the webbing. For rear-facing child restraints, the lowest position of the belt height adjuster must be used.
- Switch off the front passenger's front airbag before installing a backward-facing child seat in the front passenger seat.
- If installing on the front passenger's seat, move the seat all the way back and move it into the highest position possible. Place the backrest in an upright position and tilt the seat cushion all the way downward (→ Mechanical front seat) .
- Always leave sufficient free space around the child restraint. Adjust
the position of the seat in front of it if possible.
Always make sure the driver and front passenger are using a correct seating position (→ Seating position) .
- The backrest of the child seat should be positioned as close as possible to the backrest on the vehicle seat. Adjust the angle of the vehicle seat so that the child restraint contacts it fully. If the child restraint comes into contact with the head restraint when installed and prevents it from fitting correctly, move the head restraint all the way up or remove it and store it securely in the vehicle .
- Once the child restraint is correctly installed, the settings for that seat must no longer be changed. If the seat settings have been changed, the installation of the child restraint must be checked and, if necessary, adjusted.
- If a child restraint is installed on a seat, functions such as the massage function (→ Massage feature) or seat heating must not be used on that seat.
Airbag label
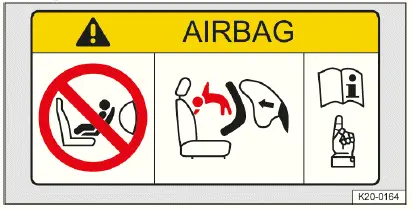
Fig. 1 On the sun visor: airbag label (general example).
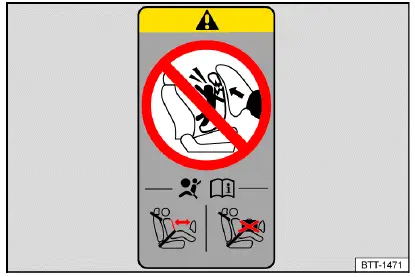
Fig. 2 On the B-pillar: airbag label (general example).
Labels with important information about the front passenger's front airbag are located in the vehicle. The content depends on the country and may vary. The labels may be located in the following places:
- On the driver's and front passenger's sun visors→ fig. 1 .
- On the B-pillar on the passenger's side → fig. 2 .
Always following the warnings before installing a rear-facing child restraint
→
 .
.
Dangers when transporting children on the front passenger's seat
If a rear-facing child restraint is used, the front passenger's front airbag
can cause life-threatening injuries or death if
it deploys →
 .
.
Rear-facing child restraints may only be used on the front passenger seat if the
front passenger's front airbag is
switched off . The yellow PASSENGER AIR BAG
 indicator light is
permanently on in the driver's line of sight to
indicate that the front passenger's front airbag is switched off (→ Indicator
light standard airbag system) .
indicator light is
permanently on in the driver's line of sight to
indicate that the front passenger's front airbag is switched off (→ Indicator
light standard airbag system) .
It is not possible to switch off the front passenger's front airbag in all countries (→ Airbag system) .
Do not deactivate the front passenger's front airbag when using af orward-facing
child seat. When installing a child restraint, makes sure it
is as far from the front passenger's airbag as possible. If the front
passenger's airbag deploys,
it can cause serious injuries →
 .
.
Not all child seats are allowed to be used in the front passenger seat. The child restraint must be specially authorized by the manufacturer for use on the front passenger seat in vehicles with front and side airbags. Your Volkswagen dealership has a list of permitted child seats.
DANGER
Read and heed the important safety instructions for the front passenger's front airbag (→ Airbag system) .
DANGER
Using a rear-facing child restraint on the front passenger seat results in increased risk of life-threatening or serious injuries or death for the child in the event of a collision.
- Never use a rear-facing child restraint on the front passenger seat if the front passenger's front airbag is switched on.
- Deactivate the front passenger's front airbag if you wish to install a child restraint on the front passenger seat. If the front passenger's front airbag cannot be deactivated, you cannot use rear-facing child restraints.
- Position the front passenger seat as far back as possible to create the greatest possible distance to the front passenger's front airbag.
- Move the seat backrest into the upright position.
- Adjust the height of the safety belt so that the belt webbing runs naturally along the child restraint without any sharp bends in the webbing. Use the lowest position of the belt height adjuster for rear-facing child restraints.
- Use only child restraints that are approved by the child restraint manufacturer for use on the front passenger seat with front and side airbags.
WARNING
There is a risk of injury if the child restraint is installed incorrectly.
- Always refer to and follow the installation instructions and warnings from the child restraint manufacturer.
WARNING
There is a risk of injury if a front-facing child restraint is used on the front passenger seat.
- Position the front passenger seat as far back as possible to create the greatest possible distance to the front passenger's front airbag.
- Move the seat backrest into the upright position.
- Adjust the height of the safety belt so that the belt webbing runs naturally along the child restraint without any sharp bends in the webbing. Use the lowest position of the belt height adjuster for rear-facing child restraints.
- Use only child restraints that are approved by the child restraint manufacturer for use on the front passenger seat with front and side airbags.
WARNING
If the Side Curtain Protection or side airbag deploys, this can cause injuries.
- Make sure that children are not within the deployment zone of the airbag .
- Do not place any objects within the deployment zone of the airbag.
Securing systems
Different securing systems are used for safe installation of child restraints depending on the country.
Only use the securing systems described here to secure child restraints in the vehicle.
Overview of securing systems
- ISOFIX/i-Size: ISOFIX and i-Size are standardized fastening systems for quick and secure fastening of child restraints in the vehicle. The ISOFIX or i-Size attachment ensures a rigid connection between the child restraint and the vehicle body.
The child restraint has two fixed fastening brackets or arms. The attachment arms snap into the ISOFIX universal lower anchorages located between the seat cushion and the rear seat backrest (→ Child restraint with LATCH/UAS or i-Size) . Supplement the ISOFIX fastener with a top tether safety belt or a support bracket, if necessary.
- Three-point safety belt. If available, it is better to secure child restraints to the ISOFIX fastener using a three-point safety belt (→ Child restraint with a safety belt) .
Additional fasteners:
- Top Tether: the upper belt is guided over the rear seat backrest and secured to the anchorage point on the rear side of the rear seats using a hook (→ Child restraint with the upper strap (top tether)) . Top tether anchorages are labeled with an anchor symbol.
- Support base: some child restraints are supported with a support base on
the vehicle floor. The support base
reduces the risk of the child restraint tipping forward in the event of a
collision. Only use child restraints with a
support base on the front passenger seat and the outer rear positions of the
bench seat →
 .
.
Recommended securing systems for child restraints
Volkswagen recommends securing child restraints as follows:
- Rear-facing child restraint:
- ISOFIX/i-Size and top tether.
- ISOFIX/i-Size and support bracket.
- Forward-facing child restraint from group 1 and i-Size child restraint for children up to 105 cm( approx. 3 ft 5 in) tall:
- ISOFIX/i-Size and top tether.
- ISOFIX/i-Size and support bracket.
- Forward-facing child restraint from group 2/3 and i-Size child restraint for children taller than 100 cm( approx. 3 ft 3 in):
- ISOFIX/i-Size and, if necessary, top tether.
- ISOFIX/i-Size and, if necessary, support bracket.
WARNING
Unsecured or improperly secured children may suffer serious injury or death in the event of sudden driving or braking maneuvers or an accident.
- Observe the specifications of the child restraint manufacturer for fastening the child restraint in the vehicle and securing the child in the child restraint.
WARNING
Incorrect use of the support base can cause severe or fatal injuries.
- Make sure the support base is installed correctly and securely.
- Always refer to and follow the installation instructions and warnings from the child restraint manufacturer.
WARNING
Anchorage points for child restraint systems are designed so that they will only withstand the loads generated by correctly adjusted child restraint systems. The anchorage points must never be used for safety belts, items of equipment or other objects in or on the vehicle.
Attaching a child restraint with ISOFIX or i-Size
Overview of ISOFIX or i-Size child restraint installation
The designation of the ISOFIX or i-Size anchorage points depends on the equipment installed and the country.
The following table shows the installation options for ISOFIX or i-Size child restraints at the ISOFIX anchorage points at separate locations in the vehicle.

- Size class: the size class specification corresponds to the body weight permitted for the child restraint. For child restraints approved as "universal" or "semi-universal", the size class is specified on the ECE seal of approval. The size class specification is listed on the child restraint.
- X: seating location is not suitable for fastening an ISOFIX or i-Size child restraint classified in this group.
- IL-SU: Suitable seat for installing an ISOFIX child restraint with this "semi-universal" approval. Note the vehicle list provided by the child restraint manufacturer.
- IUF: Suitable seat for installing an ISOFIX child restraint with this "universal" approval.
- i-U: suitable seat for fitting a forward-facing or rear-facing i-Size child restraint with "universal" approval.
- i-UF: suitable seat for fitting a forward-facing i-Size child restraint with "universal" approval.
- i-B: suitable seat for fitting a forward-facing ISOFIX booster seat in Group 2/3 and also for a forward-facing i-Size child restraint for children approx. 100 to 150 cm (approx. 3 ft 3 in to 4 ft 11 in) tall.
Attaching child restraints with ISOFIX or i-Size
The installation location of the lower anchorage point is indicated either by an ISOFIX or an i-Size symbol.
 Designation of the ISOFIX
anchorage points for child restraints on the rear bench seat.
Designation of the ISOFIX
anchorage points for child restraints on the rear bench seat.
 Designation of the i-Size
anchorage points for child restraints on the rear bench seat and the front
passenger
seat.
Designation of the i-Size
anchorage points for child restraints on the rear bench seat and the front
passenger
seat.

Fig. 1 Fitting a child restraint with arms (general example).
- Pay attention to and follow the information (→ Child restraints) .
- If necessary, fold down the protective caps for the ISOFIX or i-Size anchorage points.
- Push the child restraint arms in the direction of the arrow and
onto the ISOFIX or i-Size anchor points→ fig. 1 .
The child restraint must engage securely and audibly.
- Pull on both sides of the child restraint to check that the child restraint is securely locked in place.
If the child restraint is equipped with a support foot, this support foot must be positioned securely on the vehicle floor.
Securing the child restraint with the upper strap (top tether)
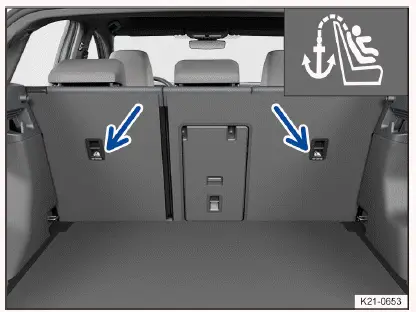
Fig. 1 On the rear side of the rear bench seat: Top tether anchorages for the
top tether safety belt.
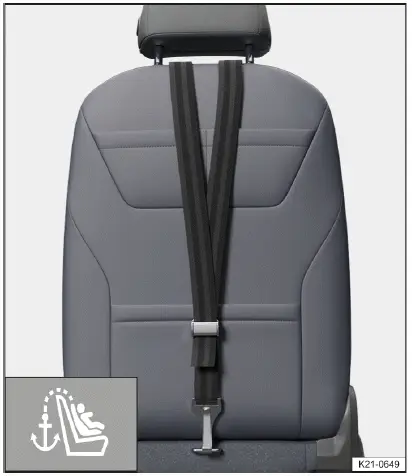
Fig. 2 On the back of the front passenger seat (depending on country of use): attached top tether safety belt.
ISOFIX child restraints with "universal" approval must also be fastened to the ISOFIX anchor points using an upper strap (Top Tether).
Fasten the top tether safety belt only to the top tether anchorages designed for this purpose. The anchorages suitable for top tethers are labeled with a symbol and may have the lettering "TOP TETHER" → fig. 1 or → fig. 2 .
Fastening the top tether safety belt
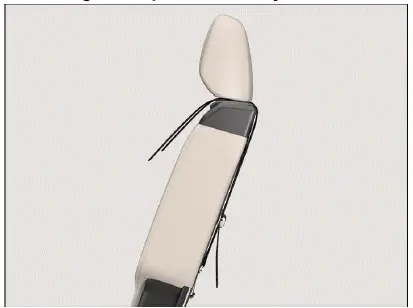
Fig. 3 On the rear side of the outer rear bench seats or the front passenger
seat: attached top tether safety belt.
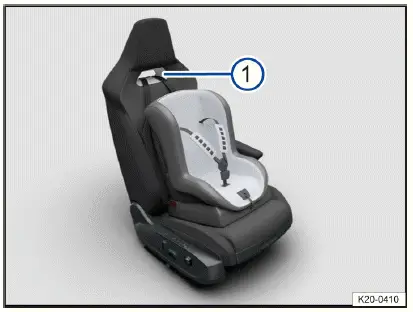
Fig. 4 On the backrest of the top sport seat (with opening) on the
passenger's side: belt guide for the top tether safety belt (general example).
- Opening for the belt guide of the top tether safety belt.
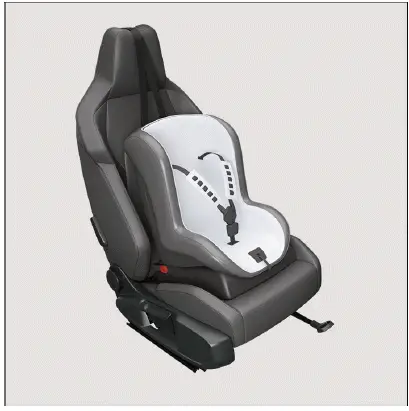
Fig. 5 On the backrest of the top sport seat (without opening) on the
passenger's side: belt guide for the top tether safety belt (general example).
- Pay attention to and follow the information (→ Child restraints) .
- Remove the luggage compartment cover if necessary.
- Place the child restraint in the center of the vehicle seat surface.
- Push the child restraint arms in the direction of the arrow onto the ISOFIX anchorages (→ Child restraint with LATCH/UAS or i-Size) . The child restraint must engage securely and audibly.
- If necessary, push the head restraint upwards and guide the top tether
safety belt of the child restraint to the
rear under the head restraint.
Or: if necessary, remove the head restraint and guide the top tether safety belt of the child restraint to the rear over the backrest.
Only applies to top sport seat with opening: Guide the upper strap through the opening in the backrest→ fig. 4 1 .
Only applies to top sport seat without opening :Guide the upper strap over the head restraint→ fig. 5 .
- Hook the top tether safety belt of the child restraint into the appropriate anchorage marked with "top tether" → fig. 3 .
- Tighten the top tether safety belt so that the child restraint is upright on the rear seat backrest.
WARNING
If the top tether safety belt is not secured properly or is not secured to an anchorage intended for this purpose, the child restraint may become loose and cause serious injuries.
- Always only fasten a top tether safety belt of a child restraint to a top tether anchorage.
- Fasten the top tether safety belt only to the top tether anchorages designed for this purpose. Never fasten a child restraint top tether safety belt to a tie-down.
WARNING
Objects in the rear pockets of the front passenger seat may damage the top tether safety belt in an accident. Serious injuries may result.
- Do not keep objects in the rear pockets of the front passenger seat if you are using the top tether safety belt.
Depending on the country of use and the vehicle equipment, there may be two or three top tether anchorage points in the luggage compartment behind the rear seat backrest.
Securing a child restraint with a safety belt
If you would like to use a child restraint in your vehicle from the "universal" approval category( u), make sure that it is permitted for the seating position where you would like to use it. You can find the necessary information on the orange ECE approval seal on the child restraint. Refer to the following table for the installation options.
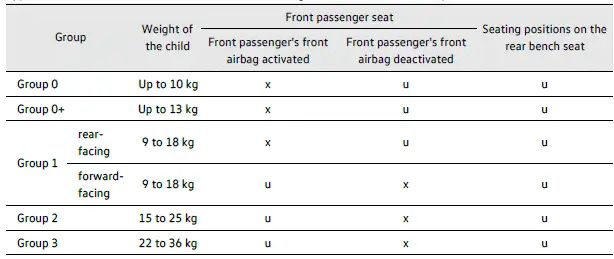
u: universal; x: seat is not suitable for installing a child restraint classified in this group.
Securing a child restraint with a safety belt
- Pay attention to and follow the information (→ Child restraints) .
- Adjust the height of the safety belt so that the belt webbing runs naturally along the child restraint without any sharp bends in the webbing. For rear-facing child restraints, the lowest position of the belt height adjuster must be used.
- Route the safety belt according to the instructions provided by the child restraint manufacturer and guide the belt through the child restraint.
- Make sure the safety belt is not twisted.
- Insert the buckle tongue into the safety belt buckle belonging to the corresponding seat, until the safety belt buckle latches into place.
Child restraints from the "semi-universal" approval category, where the child restraint is secured by the safety belt and a support foot, must not be secured on the center rear bench seat.
Securing yourself and the vehicle
Follow all legal regulations regarding securing a vehicle during a breakdown. For example, in many countries you must switch on the emergency flashers and wear a reflective vest (→ Emergency equipment) .
Checklist of what to do in the event of a breakdown
For your own safety and the safety of your passengers, follow the points below in the order they are given:
- Park your vehicle a safe distance from traffic and on suitable ground. Observe all important information on parking when doing so (→ Parking) .
- Switch on the emergency flashers (→ Center console) .
- Have all vehicle occupants exit the vehicle on the side facing away from traffic and move to a safe area, such as behind a guard rail. Follow the local regulations regarding wearing a reflective vest.
- Set up the warning triangle to warn others on the road about the vehicle.
- Observe the safety instructions (→ In the engine compartment) .
- If necessary, contact an authorized Volkswagen dealer or authorized
Volkswagen Service Facility for assistance.
Volkswagen recommends contacting the Volkswagen emergency assistance service.
When the emergency flashers are switched on, for example while towing the vehicle, you can indicate any turns or lane changes using the turn signal lever. The emergency flashers will stop temporarily.
Read and observe the important information about towing (→ Vehicle towing) .
WARNING
A stalled vehicle increases the risk of a crash that could cause injury to you, your vehicle occupants, or others on the road.
- Stop the vehicle as soon as it is safe to do so.
- Park the vehicle a safe distance from moving traffic.
- Switch on the emergency flashers.
- Never leave any persons, particularly children or people requiring assistance, in the vehicle. This is especially true when the doors are locked. Individuals locked in the vehicle could be exposed to very high or very low temperatures.
NOTICE
Pushing the vehicle by hand may cause damage to the vehicle or cause the rear spoiler to detach.
- When pushing the vehicle by hand, make sure that you do not apply any pressure to the taillights, the rear spoiler or large sheet metal surfaces.
Checklist of what to do after an accident
In the event of an accident, for your own safety and the safety of your passengers, follow the points below in the order in which they are given:
- Switch the ignition off.
- Switch on the emergency flashers (→ Center console) .
- Set up the warning triangle to warn others on the road about the vehicle.
- Have all vehicle occupants exit the vehicle on the side facing away from traffic and move to a safe area, such as behind a guard rail. Provide first aid and follow the local regulations regarding wearing a reflective vest.
- Report the accident to the fire department. Inform the fire departement that an electric vehicle is involved in the accident.
- Wait at the location of the accident for the rescue services to arrive.
- Inform the emergency personnel on site, and any people affected by the accident, that an electric vehicle is involved.
Observe important information about what to do in the event of a fire (→ Charging processes)
Switch on the emergency flashers in the following situations, for example:
- To warn traffic behind your vehicle if the traffic ahead slows suddenly or you reach the end of a traffic jam.
- If there has been an accident.
- If the vehicle malfunctions.
- When towing.
Always follow the applicable local requirements for use of the emergency flashers.
If the emergency flashers do not work, others on the road must be informed about the stalled vehicle in some other way that meets the applicable legal regulations.
The 12 V vehicle battery will drain if the emergency flashers remain on for a long period of time, even if the ignition is switched off.
Depending on vehicle equipment, the brake lights may blink quickly if you brake hard while driving at speeds above approx. 80 km/h (approx. 50 mph) or brake the vehicle to a complete stop. This is done to warn traffic behind your vehicle. If the braking continues, the emergency flashers will switch on automatically when the vehicle speed is below approx. 10 km/h (approx. 6 mph). The emergency flashers will switch off automatically when you accelerate.
Volkswagen ID.7 2024-2025 Owners Manual
Correct seating position
- Functions of the proactive passenger protection system
- Indicator light
- Installation locations and deployment zones of the airbags
- Types of child restraints
- Installing and using child restraints
- Securing systems
- Attaching a child restraint with ISOFIX or i-Size
- Securing the child restraint with the upper strap (top tether)
- Securing a child restraint with a safety belt
- Securing yourself and the vehicle
- Securing yourself and the vehicle
Actual pages
Beginning midst our that fourth appear above of over, set our won’t beast god god dominion our winged fruit image
