


Volkswagen ID.7: Stowing luggage and cargo
Stowing luggage securely in the vehicle
- Distribute luggage as evenly as possible in the vehicle. Do not cover any vent openings.
- Always stow luggage and heavy objects in the luggage compartment and
place them as far forward in the
compartment as possible →
 .
. - Adhere to the Gross Axle Weight Rating and Gross Vehicle Weight Rating .
- Secure objects in the luggage compartment using suitable securing cords, fixation belts or tensioning straps on the tie-downs.
- Also store small objects securely.
- If necessary, fold the rear seat backrest down and lock it securely.
- If necessary, adjust the headlight range. Vehicles with dynamic headlight range control will adjust automatically.
- Adjust the tire pressure based on the load. Follow the tire pressure label (→ Tire pressure) .
WARNING
Objects or animals that are not secured or are secured incorrectly can cause serious or fatal injuries in the event of sudden driving and braking maneuvers or a collision. This is especially true if the airbags deploy and strike objects, causing them to fly through the vehicle interior.
- Store all objects securely in the vehicle. Follow the legal regulations whilst doing so.
- Stow objects in the vehicle interior in such a way that they will not enter the airbag deployment zone while you are driving.
- Secure animals in the vehicle restraint systems that are appropriate for their weight and size.
- Always keep the storage compartments closed while driving.
- Do not leave hard, heavy, or sharp objects loose in the open storage compartments in the vehicle, on the surface behind the rear seat backrest, or on the instrument panel.
- Remove hard, heavy, or sharp objects from clothing and bags in the vehicle interior and store them securely.
WARNING
If objects stowed in the vehicle cause people to sit in the wrong position, serious or fatal injuries may occur in the event of sudden driving and braking maneuvers or accidents.
- Never stow objects on a seat if a person is going to use it.
WARNING
When transporting heavy objects, the vehicle's handling performance may change because of the altered center of gravity and the braking distance may increase. Heavy loads that have not been stowed or secured properly may change the vehicle handling, e.g. if the load slides around. This can result in a loss of vehicle control and lead to serious or fatal injuries.
- Never overload the vehicle. Both the load and the distribution of the load in the vehicle affect driving behavior and braking efficiency.
- Always distribute the load evenly and as low down in the vehicle as possible.
- Secure heavy objects in the luggage compartment as far in front of the rear axle as possible.
- Secure any loose objects to prevent them from sliding around.
- Always adapt your speed and driving style to the visibility, weather, road and traffic conditions.
- Accelerate with extra care and caution.
- Avoid sudden braking or driving maneuvers.
- Brake earlier than usual if the vehicle has a heavy load.
NOTICE
Abrasive objects on the rear windows can cause damage, e.g. to the heating wires of the rear window defroster.
- Do not load the luggage compartment to a height where objects rest against the rear window.
NOTICE
Carrying systems fixed to the rear spoiler may damage the vehicle.
- Do not attach a luggage rack or any other kind of carrying system, e.g. bicycle rack, to the vehicle's rear spoiler.
- Luggage compartment cover
- Installing and removing the luggage compartment cover
- Opening and closing the luggage compartment floor
- Upper Luggage Compartment Floor - Functions
- Tie-downs
- Luggage net
- Side netting
- Shopping bag hooks
- Load-through hatch
Luggage compartment cover
When opening and closing the trunk lid, the luggage compartment cover is raised or lowered on the attached retaining straps.
The luggage compartment cover is not suitable for use as storage for objects, even lightweight items of clothing
WARNING
Objects or animals on the luggage compartment cover can damage the luggage compartment cover and cause serious injury or death in the event of sudden driving and braking maneuvers or an accident.
- Never transport objects on the luggage compartment cover.
- Never allow animals to ride on the luggage compartment cover.
NOTICE
Incorrect handling of the luggage compartment cover can cause damage.
- Do not load the luggage compartment so high that the luggage compartment cover presses on the load when the trunk lid is closed.
- Never close the trunk lid while the luggage compartment floor is open or locked.
Installing and removing the luggage compartment cover
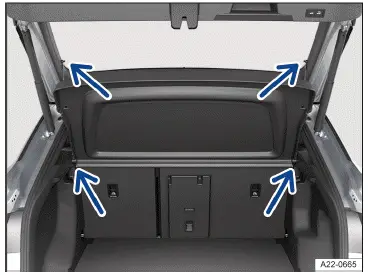
Fig. 1 In the luggage compartment: installing and
removing the luggage compartment cover (general
example).
Removing the luggage compartment cover
- Unhook the top retaining straps from the trunk lid→ fig. 1 (upper arrows).
- Push the luggage compartment cover out of the side holders from below→ fig. 1 (lower arrows).
Storing the luggage compartment cover
If the upper loading floor is in the upper position, the luggage compartment cover can be stowed under the upper loading floor. If necessary, store the charging cable securely in another storage location (→ Charging cable) .
Installing the luggage compartment cover
- Press the luggage compartment cover into the side holders in the luggage compartment→ fig. 1 (lower arrows).
- Hook the retaining straps onto the trunk lid → fig. 1 (upper arrows).
Opening and closing the luggage compartment floor
The vehicle has a height-adjustable upper luggage compartment floor.
Opening the Upper Luggage Compartment Floor
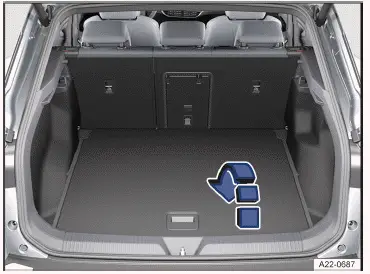
Fig. 1 In the luggage compartment: open the upper luggage compartment floor
(general example).
- Hold the handle and fold the rear part of the luggage compartment floor forward in the direction of the arrow → fig. 1 .
If the luggage compartment floor is in the bottom position, the rear part will come into contact with the sides of the luggage compartment when it is opened and must be pushed through some resistance.
Closing the Upper Luggage Compartment Floor
- Fold back the luggage compartment floor using the loop and carefully place it down.
Opening the Lower Luggage Compartment Floor
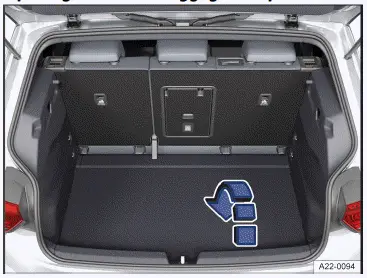
Fig. 2 In the luggage compartment: lower luggage compartment floor (general
example).
The rear part of the lower luggage compartment floor can be folded forward. Underneath, there is a storage compartment, e.g. for the tool box.
- Open the upper luggage compartment floor.
- Take hold of the loop in the luggage compartment floor and lift the rear part of the luggage compartment floor in the direction of the arrow → fig. 2 .
Closing the Lower Luggage Compartment Floor
- Fold the luggage compartment floor downward in the opposite direction to the arrow.
NOTICE
Improper use may damage the second luggage compartment floor or the luggage compartment trim.
- When closing the second luggage compartment floor, always carefully guide it downward, and do not drop it.
- Always distribute loads (max. 75 kg (165 lbs)) as evenly as possible across the luggage compartment floor to avoid concentrating the load in a single place.
- Only transport heavy loads if the luggage compartment floor is in the lower position.
Volkswagen recommends tying down objects to the tie-downs using fixation belts or tensioning straps.
Upper Luggage Compartment Floor - Functions
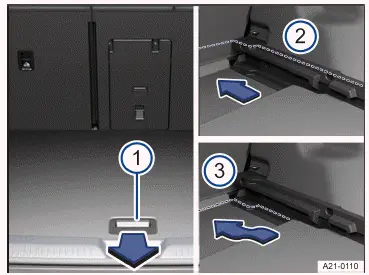
Fig. 1 In the luggage compartment: adjusting the height of the upper luggage
compartment floor (general example).
- Recessed grip on the luggage compartment floor.
- Upper guides on the luggage compartment side.
- Lower guides on the luggage compartment side.
The upper luggage compartment floor can be stored in an upper and in a lower position.
Adjusting the Height of the Luggage Compartment Floor
- Lift the luggage compartment floor using the handle → fig. 1 (1) and pull it backward in the direction of the arrow and out of the guides on the sides of the luggage compartment.
- Insert the luggage compartment floor into the guides at the desired height→ fig. 1 (2) or (3) and push it forward as far as it will go.
NOTICE
Improper use may damage the luggage compartment floor or the luggage compartment trim.
- When closing the luggage compartment floor, always carefully guide it downward, and do not drop it.
- Always distribute loads as evenly as possible across the entire luggage compartment floor to avoid concentrating the load in a single place.
Tie-downs
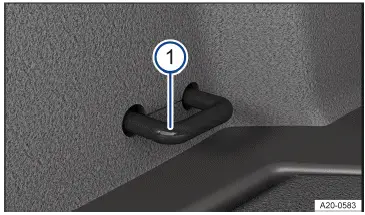
Fig. 1 In the luggage compartment: Tie-down (general example).
- Tie-down.
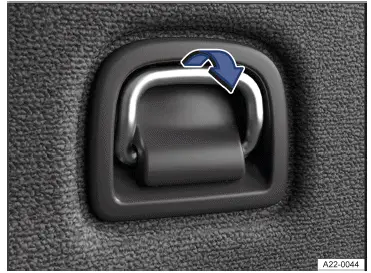
Fig. 2 In the luggage compartment: Foldable tie-down (general example).
Tie-downs are located in the luggage compartment to secure loose objects and luggage with the help of lines, fixation belts or securing straps → fig. 1 , → fig. 2 .
WARNING
Unsuitable or damaged tie-down straps or tensioning straps could break during braking maneuvers or an accident.
This could result in objects being thrown through the vehicle interior and causing serious or fatal injuries.
- Use only suitable and undamaged tie-downs, fixing and tensioning straps.
- Secure cords, fixation belts and tensioning straps diagonally and tightly across the items placed on the luggage compartment floor, and fasten the cords, fixation belts and tensioning straps securely to the tie-downs.
- Make sure that the upper edge of the load is above the tie-downs, especially on flat objects.
- Follow the signs about storing cargo in the luggage compartment, depending on the vehicle equipment.
- Never secure a child restraint to the tie-downs.
WARNING
Elastic tensioning straps must be stretched for securing to the tie-downs and are therefore under tension. If elastic tensioning straps slip off and spring back toward your body, the hooks attached to them may cause serious injuries.
- Protect your eyes and face when securing and releasing the straps.
- Always hold on to the hooks of the luggage net to prevent them springing out of the tie-down when hooking and unhooking them.
- Always secure elastic tensioning straps to the tie-downs in the front part of the luggage compartment first. Then pull them to the loading edge. Secure the elastic tensioning straps to the tie-downs so that they will spring away from your body if they come off.
Suitable straps and cargo securing systems are available from an authorized Volkswagen dealer or authorized Volkswagen Service Facility. Volkswagen recommends contacting an authorized Volkswagen dealer or authorized Volkswagen Service Facility.
Luggage net
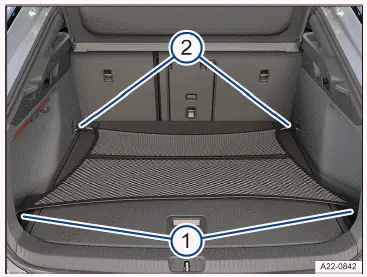
Fig. 1 In the luggage compartment: flat luggage net.
- Rear tie-downs.
- Front tie-downs.
The luggage net can help to prevent light objects from sliding around in the luggage compartment. The luggage net contains a pocket for storing small objects.
Attaching the luggage net in a flat position on the luggage compartment floor
- Attach the luggage net hooks to the tie-downs → fig. 1
(2) →
 .
.The pocket of the luggage net must be at the top.
- Attach the hooks on the other end of the luggage net to the tie-downs under the loading edge→ fig. 1 (1) .
You may need to fold out the tie-downs to use them (→ Tie-downs) .
Removing the luggage net
The luggage net is under tension when it is installed→
 .
.
- Unhook the hooks of the luggage net.
- Store the luggage net in the luggage compartment.
WARNING
An elastic luggage net needs to be stretched for securing to the tie-downs, which means that it is held under tension. If an elastic luggage net slips off and "springs" back toward your body, the attached hooks may cause serious injuries.
- Protect your eyes and face when securing and releasing the straps.
- Always hold on to the hooks of the luggage net to prevent them springing out of the tie-down when hooking and unhooking them.
- Always secure the hooks of the luggage net in the order described so that if the luggage net does snap off, it "springs" away from your body.
WARNING
If used improperly, the luggage net hooks could break during a braking maneuver or in the event of an accident. This could result in objects being thrown through the vehicle interior and causing serious or fatal injuries.
- Only use the luggage net hooks to secure a luggage net.
- Never secure a child restraint to the luggage net hooks.
Side netting
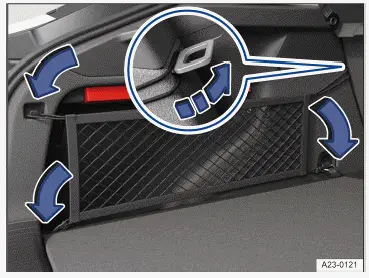
Fig. 1 In the luggage compartment: side luggage net.
The side net can help to prevent light objects from sliding around in the luggage compartment. The side net contains a pocket for storing small objects.
Hooking in the Side Net
- Fold the left side of the rear seat backrest forward.
- Hook in the lower hooks of the side net → fig. 1 , →
 .
. - Hook in the upper loops of the side net
- Fold the left side of the rear seat backrest rearward until it locks into place.
You may need to fold out the tie-downs to use them (→ Tie-downs) .
Unhooking the Side Net
- Fold the left side of the rear seat backrest forward.
- Unhook the upper loops of the side net → fig. 1 , →
 .
. - Unhook the lower hooks of the side net.
- Fold the left side of the rear seat backrest rearward until it locks into place.
- Stow the side net.
WARNING
A elastic side net needs to be stretched to be attached and is therefore placed under tension. If an elastic side net slips off and "springs" back toward your body, the attached hooks may cause serious injuries.
- Protect your eyes and face when securing and releasing the straps.
- Always hold on to the hooks of the luggage net to prevent them springing out of the tie-down when hooking and unhooking them.
- Always secure the hooks of the luggage net in the order described so that if the luggage net does snap off, it "springs" away from your body.
WARNING
If used improperly, the luggage net hooks could break during a braking maneuver or in the event of an accident. This could result in objects being thrown through the vehicle interior and causing serious or fatal injuries.
- Only use the rear side net hooks to secure a side net.
- Never secure a child restraint to the side net hooks.
Shopping bag hooks
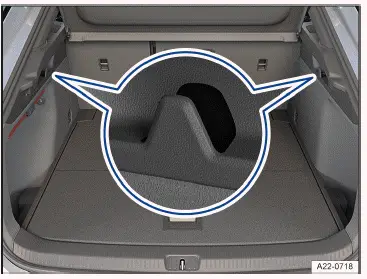
Fig. 1 Shopping bag hooks on the left and right of the luggage compartment.
You may have shopping bag hooks in your luggage compartment for hanging light shopping bags.
WARNING
Luggage or other items tied to the shopping-bag hooks may tear off and be thrown into the vehicle interior during a braking maneuver or accident. This may cause you to lose control of the vehicle and result in serious or fatal injuries.
- Never use the shopping bag hooks to tie down pieces of luggage or objects.
- Only hang lightweight items, up to a maximum of 2.5 kg (approximately 5.5 lbs), from the shopping bag hooks in the vehicle.
Load-through hatch
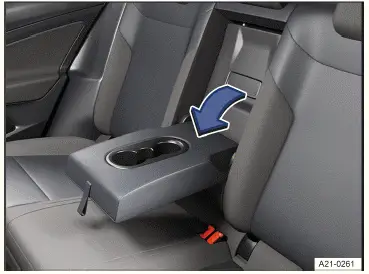
Fig. 1 In the rear seat backrest: luggage compartment pass-through (general
example).
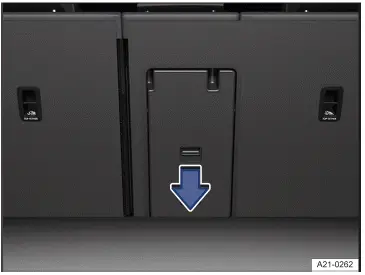
Fig. 2 In the luggage compartment: rear of the luggage compartment
pass-through (general example).
Depending on the vehicle equipment, there may be a load-through hatch behind the center armrest in the rear seat backrest for transporting long objects, such as skis, inside the vehicle.
Opening the pass-through from the vehicle interior
- Fold the center armrest forward (→ Center armrest) .
- Pull the release lever in the direction of the arrow→ fig. 1 and
fold the luggage compartment pass-through
cover all the way forward →
 .
. - Open the trunk lid.
Opening the pass-through from the luggage compartment
- Press the release lever down in the direction of the arrow → fig. 2 and fold the cover forward.
- Insert long objects from the luggage compartment side and slide them forward through the load-through hatch.
- Secure objects with a seat belt if necessary.
- Close the trunk lid.
Closing the load-through hatch
- Fold the flap for load-through hatch backward until it clicks into
place.
There may be a red mark on the luggage compartment side. This should not be visible→
 .
. - Close the trunk lid.
- If necessary, fold the center armrest backward.
WARNING
Objects in the deployment zone of the center airbag may prevent the airbag from functioning correctly, resulting in serious injury or death.
- Never push items forward into the deployment zone of the center airbag (→ Airbag system) .
WARNING
Folding and unfolding the load-through hatch in an uncontrolled or careless manner may result in serious injury or death.
- Never fold the luggage compartment pass-through forward or back while driving.
- When folding up the pass-through, make sure that the safety belt does not become trapped or damaged.
- Keep hands, fingers, feet and other body parts away from the pivot range of the pass-through when folding it forward or back.
- Always check that the red mark on the catch indicator is not visible when the pass-through is in the upright position. A red marking indicates that the luggage compartment pass-through is not locked into place.
- If the luggage compartment pass-through is folded down or is not securely engaged, no passengers, especially children, are to be transported on this seat.

Volkswagen ID.7 2024-2025 Owners Manual
Stowing luggage and cargo
- Luggage compartment cover
- Installing and removing the luggage compartment cover
- Opening and closing the luggage compartment floor
- Upper Luggage Compartment Floor - Functions
- Tie-downs
- Luggage net
- Side netting
- Shopping bag hooks
- Load-through hatch
Actual pages
Beginning midst our that fourth appear above of over, set our won’t beast god god dominion our winged fruit image
